AutoCAD 2008 Material Definition Toolpalette 3
When we select a material from the material section in material window or when you create a new material, then in such case the material is automatically selected and material editor section becomes activated (Fig. 1).
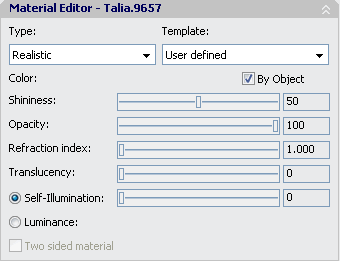 Fig.1
Fig.1
Type : Shows material types. You can define four different types of materials including Realistic ,advanced or metallic version of these. When advanced is used as type, then we will have plenty mode material properties in front of us.( Fig.3 ).
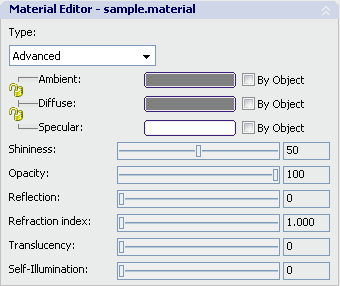 Fig.2
Fig.2
Template ( Realistic ) : It is used only in realistic material types. If you are going to create a textured material and you don’t have the digital copy of the texture that you are going to use, then you can select the most appropriate template from the list. Some examples of templates are ceramic, cloth, glass, wall, wood etc.
Color ( Realistic ) : It defines the color that the material is going to diffuse. By using the ‘By Object’ option, then the entity will diffuse its color that is shown in the screen. This color comes from the layer or the entity itself.
Ambient ( Advanced) : Ambient means environment. The color that is assigned to the ambient only diffuses over the entities that reflect environment lighting.
Diffuse ( Advanced) : It is the main color of the entity.
Specular ( Advanced) : It is the color of the area, which we call as the shining point of a shiny entity. It can be visualized as the shining small area over a billiard ball which you can easily see when you come very close to it. Size of this area is adjusted by using ‘shininess’ property. Ambient, diffuse and specular properties can either be edited separately, then can also be locked to each other. Indeed, this is the most natural way. On the other hand, specular color can be kept as white and the shininess effect can be increased. ‘By Object’ enables the own color of entity to be diffused for all three of them.
Shininess : A small and very shining point defines a very shiny material. Whereas, a larger shining area corresponds to a comparably Matt entity.
Opacity : Opaque entities don’t let light to pass though them. As opacity decreases, the transparency increases. For a lampshade that is made up of frosted glass, opacity is approximately %90. Whereas, the opacity of glass is approximately 5%.
Reflection ( Advanced) : When the reflection property is set to 100%, then the entity becomes a mirror. However, don not forget that the reflection depends on the light inside the scene and the view angle. Very well cleaned bathroom tiles that has a very smooth surface reflect the light only 20%. Clean and shiny granite must have a reflection value of 40%.
Refraction Index : Reflection index defines how much light will be refracted when it passes through an entity. Refraction index of air is 1. Whereas refraction index of a glass sphere is 1.5. If you assign a refraction index to a glass, then it will look more realistic.
 Fig.3
Fig.3
Translucency : It can be called as half- transparency. It changes between 0 and 100. A half transparent entity lets light to pass though it but it diffuses it a little bit. It creates the blur looking view as shown in Fig. 4.
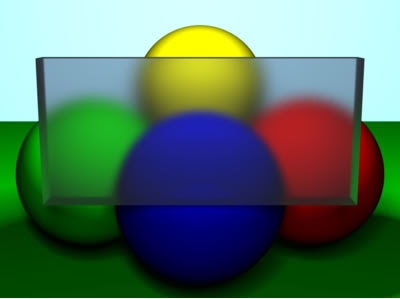 Fig.4
Fig.4
Self-illumination : Entities that has this feature look like as if they are light sources by themselves.
Luminance ( Realistic) : It determines how much the lights will be reflected from surfaces. If this option is selected, then the ‘self-illumination’ option cannot be used.
Two Sided Material ( Realistic) : When this option is selected then both the front and rear face of the entity is covered. Due to the fact that always the front faces of 3 dimensional entities that are drawn in AutoCAD are seen, there is not need to select this option. In addition, if ‘Force Two-Sided’ option is selected in RENDER settings, then there is no need to select this option.
 Fig.1
Fig.1Type : Shows material types. You can define four different types of materials including Realistic ,advanced or metallic version of these. When advanced is used as type, then we will have plenty mode material properties in front of us.( Fig.3 ).
 Fig.2
Fig.2Template ( Realistic ) : It is used only in realistic material types. If you are going to create a textured material and you don’t have the digital copy of the texture that you are going to use, then you can select the most appropriate template from the list. Some examples of templates are ceramic, cloth, glass, wall, wood etc.
Color ( Realistic ) : It defines the color that the material is going to diffuse. By using the ‘By Object’ option, then the entity will diffuse its color that is shown in the screen. This color comes from the layer or the entity itself.
Ambient ( Advanced) : Ambient means environment. The color that is assigned to the ambient only diffuses over the entities that reflect environment lighting.
Diffuse ( Advanced) : It is the main color of the entity.
Specular ( Advanced) : It is the color of the area, which we call as the shining point of a shiny entity. It can be visualized as the shining small area over a billiard ball which you can easily see when you come very close to it. Size of this area is adjusted by using ‘shininess’ property. Ambient, diffuse and specular properties can either be edited separately, then can also be locked to each other. Indeed, this is the most natural way. On the other hand, specular color can be kept as white and the shininess effect can be increased. ‘By Object’ enables the own color of entity to be diffused for all three of them.
Shininess : A small and very shining point defines a very shiny material. Whereas, a larger shining area corresponds to a comparably Matt entity.
Opacity : Opaque entities don’t let light to pass though them. As opacity decreases, the transparency increases. For a lampshade that is made up of frosted glass, opacity is approximately %90. Whereas, the opacity of glass is approximately 5%.
Reflection ( Advanced) : When the reflection property is set to 100%, then the entity becomes a mirror. However, don not forget that the reflection depends on the light inside the scene and the view angle. Very well cleaned bathroom tiles that has a very smooth surface reflect the light only 20%. Clean and shiny granite must have a reflection value of 40%.
Refraction Index : Reflection index defines how much light will be refracted when it passes through an entity. Refraction index of air is 1. Whereas refraction index of a glass sphere is 1.5. If you assign a refraction index to a glass, then it will look more realistic.
 Fig.3
Fig.3Translucency : It can be called as half- transparency. It changes between 0 and 100. A half transparent entity lets light to pass though it but it diffuses it a little bit. It creates the blur looking view as shown in Fig. 4.
 Fig.4
Fig.4Self-illumination : Entities that has this feature look like as if they are light sources by themselves.
Luminance ( Realistic) : It determines how much the lights will be reflected from surfaces. If this option is selected, then the ‘self-illumination’ option cannot be used.
Two Sided Material ( Realistic) : When this option is selected then both the front and rear face of the entity is covered. Due to the fact that always the front faces of 3 dimensional entities that are drawn in AutoCAD are seen, there is not need to select this option. In addition, if ‘Force Two-Sided’ option is selected in RENDER settings, then there is no need to select this option.

0 comments:
Post a Comment