Topics covered in this Lesson:1-8
Layer, Text, Dimensioning, Scale
Now that you've learned a lot of the drawing and modifying commands, it's time to go to the next level. This lesson will introduce you to text, dimensioning and the concept of layers. What you will do is take one of your previous assignments, save it to a new name and then add text and dimensions to it. These are the commands you'll be learning.
 Begin by opening up Assignment #5 from your CAD folder.
Using the SAVE AS More Info option, immediately save it under the name Assign6.dwg
Click HERE for the GIF version of the file.
Click HERE for the DWG version.
The first thing you want to do is create three layers. Layers are used to organize drawings. Imagine a large project for a high-rise tower. The designers would create layers for the electrical, plumbing, landscape and more. It is necessary to control the drawing and turn some layers off and view only the ones you want. This is one reason why layers are needed. But if you were to use AutoCAD professionally, every drawing you dealt with would have layers.
You will be creating a layer for the dimensions, one for the lines (objects that were drawn) and another for the text. Start the LAYER command (LA). This will bring up the Layer Properties Manager (shown below). We'll cover the things that are used most often in this lesson.
 Looking at the Dialog Box, you will see a lot of information. Notice the button beside Make Current on it. Below it is the name of the current layer you are drawing on. The main window gives you information about each particular layer. At this point, you want to be concerned with the 'Name', 'On' (light bulb) and 'Color' (colored square) columns as well as the 'New' button.
Now you have the dialog box on your screen, click the 'New' button. This will create a new layer and give you an opportunity to name it. Name this layer TEXT. Click on the small box towards the right and select yellow for the color. Create another layer and call this one DIM (for dimensions), and make its color red. Finally, create a third layer and call it OBJECT and make its color green. You have just created three new layers in your drawing. Highlight the TEXT layer and then press the 'Make Current' button. This makes the TEXT layer current and anything you draw will be placed on that layer. Your Dialog box should look like the one above. If it does, press OK to close the dialog box.
More about Layers
In the Layer Properties Manager, you will notice that each layer can have a number of specific properties.
 *Status: Displays the current state of the layer. In this example, the green check means that Objects is the current layer.
*Name: The name of the layer. Give layers understandable names.
*On: If a layer is 'On' it means that it is visible (but objects can still be erased when the 'Select > All option is used).
*Freeze: A layer is not visible and cannot be deleted.
*Lock: Layer is visible, but cannot be modified.
*Color: A specific color for everything on that layer.
*Linetype: A specific linetype (hidden, center, etc) for the layer.
*Lineweight: The visible width of the objects on that layer.
*Plot: A defined color for the plotter to use on that layer.
*Plot (yes, two colomns use the same name: Switch on or off if that layer is plotted.
*Description: A user-defined description for the layer.
ADDING TEXT
TEXT is your current drawing layer now, so what you will be doing is creating some text now. Type in TEXT on the command line. Look at the command line.
Command: text
Justify/Style/:
The first thing AutoCAD wants is a starting point for the text. Type: 0,0 to place it at the bottom left corner of your drawing. Notice that there are other options you could make, but ignore them for now.
Height <0.2000>:
Next, AutoCAD wants to know how tall you want your letters to be. For this assignment, you want them to be 1/4" tall. Type in .25 at the Height prompt.
Rotation angle <0>:
One more thing before you start typing in text, tell AutoCAD if you want to have your text rotated. Not this time, so press to accept the default of 0 degrees.
Text: (YOUR NAME - ASSIGNMENT #6)
Finally you can type in what you want to put on the drawing. At the prompt, type your NAME and ASSIGNMENT #6 Text Help then press .
You will see that AutoCAD has placed your name in the bottom left corner at 1/4" high and in yellow on the 'Text' layer.
You don't really want your name jammed into the corner like that so move it up and over 1/8" (Remember your MOVE command and relative points : @.125,.125)
Now it's time to start dimensioning your drawing. Bring up the Layer dialog box and make DIM your current layer.
This is one time when I recommend to use the icons. Dimensioning is A LOT easier this way. If you don't see your dimensioning toolbar on the screen, right click on one of your toolbar icons and check the Dimension checkbox. You'll see the toolbar appear. Close the Toolbars dialog box.
There are several different types of dimensions, here are the ones you'll be using in this lesson (Each of the dimensioning icons gives you a quick clue as to which type of dimension it will create.) The image below shows you the standard dimensioning icons. This list below shows you which dimension types you will use in this lesson (Place your mouse on the toolbar icons to see what they represent.
 Here are the ones you'll be using in this lesson.
Linear dimensions are used for dimensioning either horizontal or vertical distances.
Aligned dimensions will measure the actual length of an angled line.
Radius dimensions will give you the radius of either arcs or circles.
Diameter dimensions are used on circles.
Angular dimensions will measure the angle between two lines that you pick.
Baseline dimensions are a special type that will automatically stack dimensions along one plane as you pick points.
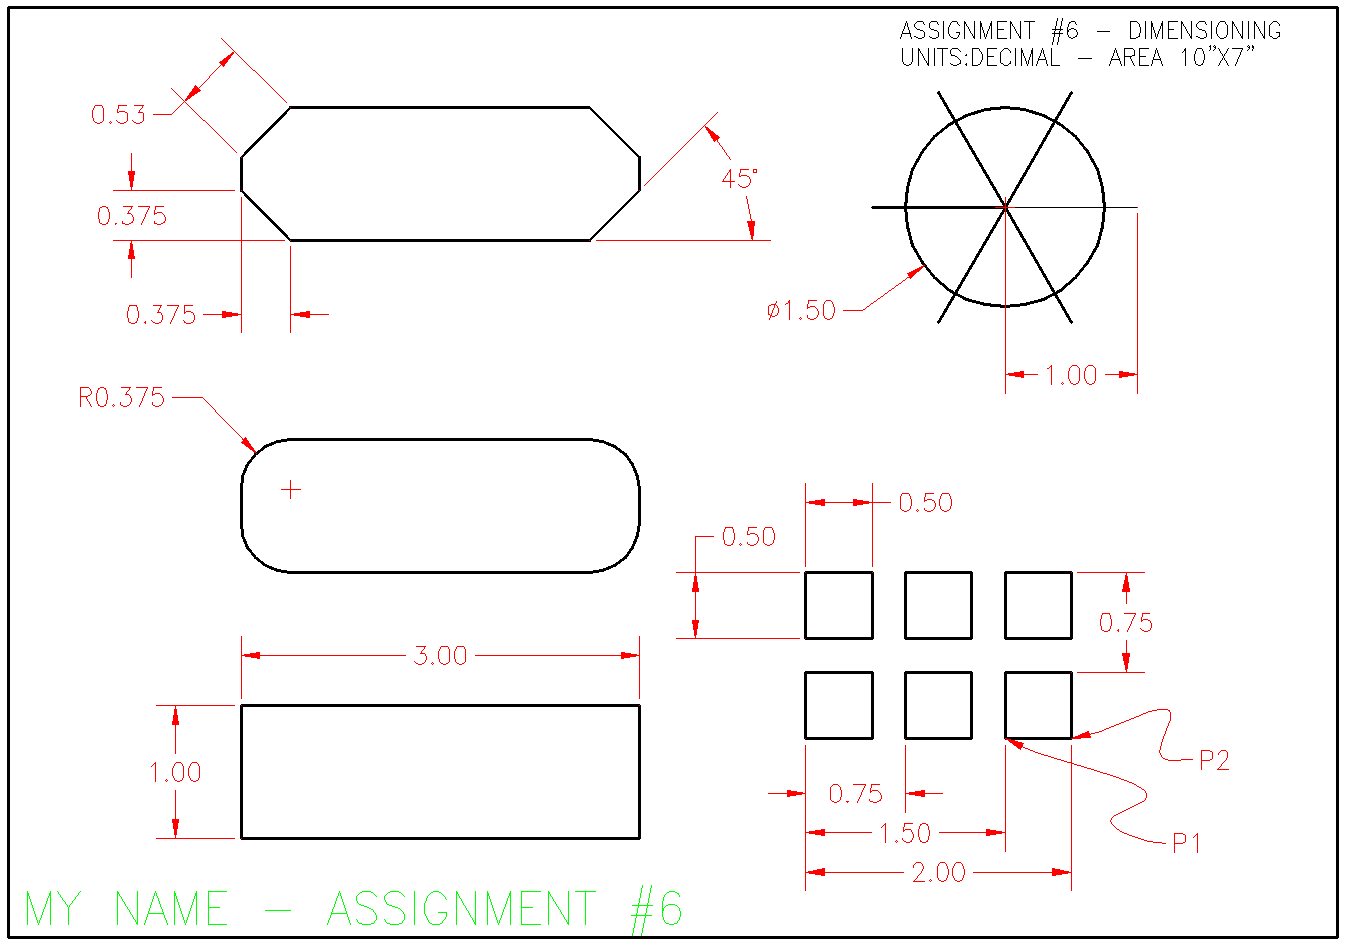
The type of dimension you pick will depend entirely upon what information you want to convey to the person reading the drawing. Look at the sample drawing and pick out the different types of dimensions and where they are used.
We'll start with the most common (and easiest): Linear Dimensions. You'll use this type to add dimensions to the rectangle in the bottom left of your drawing. Pick on the icon and then look at the command line.
 Begin by opening up Assignment #5 from your CAD folder.
Using the SAVE AS More Info option, immediately save it under the name Assign6.dwg
Click HERE for the GIF version of the file.
Click HERE for the DWG version.
The first thing you want to do is create three layers. Layers are used to organize drawings. Imagine a large project for a high-rise tower. The designers would create layers for the electrical, plumbing, landscape and more. It is necessary to control the drawing and turn some layers off and view only the ones you want. This is one reason why layers are needed. But if you were to use AutoCAD professionally, every drawing you dealt with would have layers.
You will be creating a layer for the dimensions, one for the lines (objects that were drawn) and another for the text. Start the LAYER command (LA). This will bring up the Layer Properties Manager (shown below). We'll cover the things that are used most often in this lesson.
 Looking at the Dialog Box, you will see a lot of information. Notice the button beside Make Current on it. Below it is the name of the current layer you are drawing on. The main window gives you information about each particular layer. At this point, you want to be concerned with the 'Name', 'On' (light bulb) and 'Color' (colored square) columns as well as the 'New' button.
Now you have the dialog box on your screen, click the 'New' button. This will create a new layer and give you an opportunity to name it. Name this layer TEXT. Click on the small box towards the right and select yellow for the color. Create another layer and call this one DIM (for dimensions), and make its color red. Finally, create a third layer and call it OBJECT and make its color green. You have just created three new layers in your drawing. Highlight the TEXT layer and then press the 'Make Current' button. This makes the TEXT layer current and anything you draw will be placed on that layer. Your Dialog box should look like the one above. If it does, press OK to close the dialog box.
More about Layers
In the Layer Properties Manager, you will notice that each layer can have a number of specific properties.
 *Status: Displays the current state of the layer. In this example, the green check means that Objects is the current layer.
*Name: The name of the layer. Give layers understandable names.
*On: If a layer is 'On' it means that it is visible (but objects can still be erased when the 'Select > All option is used).
*Freeze: A layer is not visible and cannot be deleted.
*Lock: Layer is visible, but cannot be modified.
*Color: A specific color for everything on that layer.
*Linetype: A specific linetype (hidden, center, etc) for the layer.
*Lineweight: The visible width of the objects on that layer.
*Plot: A defined color for the plotter to use on that layer.
*Plot (yes, two colomns use the same name: Switch on or off if that layer is plotted.
*Description: A user-defined description for the layer.
ADDING TEXT
TEXT is your current drawing layer now, so what you will be doing is creating some text now. Type in TEXT on the command line. Look at the command line.
Command: text
Justify/Style/
The first thing AutoCAD wants is a starting point for the text. Type: 0,0 to place it at the bottom left corner of your drawing. Notice that there are other options you could make, but ignore them for now.
Height <0.2000>:
Next, AutoCAD wants to know how tall you want your letters to be. For this assignment, you want them to be 1/4" tall. Type in .25 at the Height prompt.
Rotation angle <0>:
One more thing before you start typing in text, tell AutoCAD if you want to have your text rotated. Not this time, so press
 Here are the ones you'll be using in this lesson.
Linear dimensions are used for dimensioning either horizontal or vertical distances.
Aligned dimensions will measure the actual length of an angled line.
Radius dimensions will give you the radius of either arcs or circles.
Diameter dimensions are used on circles.
Angular dimensions will measure the angle between two lines that you pick.
Baseline dimensions are a special type that will automatically stack dimensions along one plane as you pick points.
The type of dimension you pick will depend entirely upon what information you want to convey to the person reading the drawing. Look at the sample drawing and pick out the different types of dimensions and where they are used.
We'll start with the most common (and easiest): Linear Dimensions. You'll use this type to add dimensions to the rectangle in the bottom left of your drawing. Pick on the icon and then look at the command line.

0 comments:
Post a Comment